pursuing and sharing the mess of life so God can craft it all into a message.
Wednesday, March 13, 2013
Craft Table with Storage
Materials:
2 IKEA Expedit (2 x 4) bookcases
2 sheets of plywood (3/4")
5 heavy duty casters
5 washers
5 lockwashers
leftover flooring
trim
18 - 20 L-brackets
Description:
1. Assemble the two bookcases
2. Cut the two sheets of plywood down to 6 ft (cut 2 ft off the long side). The sheets will now measure 4ft x 6 ft). Paint one side of each sheet to match/coordinate the finish of your EXPEDIT pieces. In my case, I just painted them white.
3. Mount 4 of the casters in the four corners (within 6" of the edge of the long side so that they will not interfere with the bookcases), and one in the center. The casters should be mounted on the side of the plywood that is NOT painted.
4. Position the bookcases parallel to each other but with 13 1/4" of space in between them. Position the plywood (with the casters) on top of the two bookcases. You should now have a 6" overhang on the long ends, and a 2" overhang on the short ends. Secure the the plywood and the bookcases together with L-brackets (2 on each of the short ends and 1 in the middle of the long side).
5. FOR THIS STEP ASSISTANCE IS REQUIRED !! Turn the table upright (see photo above)
6. Attach the 2nd piece of plywood (painted side down) to the top of the two bookcases, using the same measurements you used on the bottom.
7. Finish the top with the covering of your choice. I used leftover flooring for mine. In the main picture, I have attached the trim to the top but not yet to the bottom.
~ Irene Grimes
Numbers Fabric - Craft Rm

Materials: Britten Nummer fabric
Description: Buy 1,2mts of Britten Nummer fabric.
Soak it in tea for, about, 4 hours, this will give it an old-vintage touch. Drain and let it dry. Iron and starch the fabric.
Prepare a framework with 4 of 1mt wooden strips, joining them with wooden glue and some metal brackets.
Tense the fabric on the framework and fix it using enough staples.
Hang it and.... count.
~ Erika Serrano, Barcelona (Spain)
Gallery Wall
Gallery Wall for the Living Room / Office!
The gallery wall in the living room / office is up! It took a while, but I definitely think it was worth it :) I started with a push pin board that I made out of an old frame, you can read more here
While David and I were in Home Depot picking up wood to build the sofa table ... I found this image on Pinterest and thought that it would be a perfect solution for the gallery wall - so we grabbed materials for that and got to work!
Pinterest links here but I couldn't find the original image ...
We needed something that would be light to avoid the curtain wire sagging, so this was perfect!
Then David cut the frames with our fancy new saw - he has used it for the desk and chairs, the sofa table, and the tv stand (photos soon!) and so far he loves it!
1. Screen Mold (1/4" x 3/4" x 8') was selected to make the frames out of - We decided on a composite because it was about half the price of wood
2. After determining the size of the frames needed, screen mold was cut on a 45 degree angle with the chop saw
3. frames were glued with super glue
4. After the glue dried, I primed and applied a top coat of spray paint (I waited about 30-45 minutes between coats)
5. To hang the art - I used a grommet kit to attach the wire between the paper and frame (thanks for the ideaFlea Market Finds with Matthew Mead!)
I followed the directions on the package, except I used a hole punch instead of the tool provided because it was much easier, I would recommend!)
6. I used a rubber mallet to fasten the grommets in place
7. We hung Ikea's Dignitet curtain wire system and used Ikea's Riktig curtain clips at the top and we fastened two eye screws at the top of each frame to hang the wire from - making sure that it was tight!
8. We hung the frames and art with thin gauge wire, and attached them to the curtain clips (wire was simply twisted at the end to secure)
Finally, we used a level to help get everything straight!
The push pin board isn't hung on the curtain wire because it is too heavy ...
I brushed on watercolor and then cut circles out with a 1" hole punch (thanks for the circle punch art ideaMer Mag!)
I made a print of special dates to us ...
Annabelle on the top and my two sweet kitties that couldn't make the trip to CA (they are currently being spoiled by my parents and even turned my Dad into a cat lover :)
Some of my favorite pics of Annabelle playing fetch at the baseball field :)
Finally, I found a map of the US circa 1960's at a thrift store and put circle stickers on all the places that David and I have visited together - clever idea via Young House Love
and there you have it!
Cost Breakdown:
14 Frames - $20.60
Spray Paint - $7
Wire - $2.50
Eye Hooks - $4
Grommet Kit - $9
Curtain Rod and Clips - $15
Total Cost = $58.10
This idea worked perfectly for us since we are renting (less holes to patch when we leave!) and I love the shadows that are created by the floating frames!
Mud Room
Materials: 6 Billy Bookcases, 2 Benno TV Benches, 18 coat hooks
Description: Build the Benno TV benches, leaving out the drawers.
Build the Billies, flipping all shelves and the top/bottom upside down as you go.
I chose to omit the back panel too. Do not use the shelves in what is now the bottom half of the unit.
Place 3 upside-down Billies on each Benno, anchoring them to the wall. Screw coat hooks into the sides and back wall of each cubby.
~ Melanie Ward, Muskoka, Ontario
Build the bookcases and tv benches using the instructions they come with. The only changes you make at this point is to flip the top, middle and bottom shelves on the Billys upside down (so the holes for the hardware are the oposite direction to the instructions). This is because you will be using the unit upside down (kick plate at the top).
I didn't bother building the drawers for the tv benches since I wanted shoe room. But you can always use them for mittens etc.
Once the units are assembled, place the benches where you want them. Lift the bookcases on top and anchor to the wall using included hardware. I did this on the underside of the middle shelf. Then screw coathooks into the sides of the cubby spaces and into the wall using appropriate hardware. Only put shelves in the top half of the units for storage.
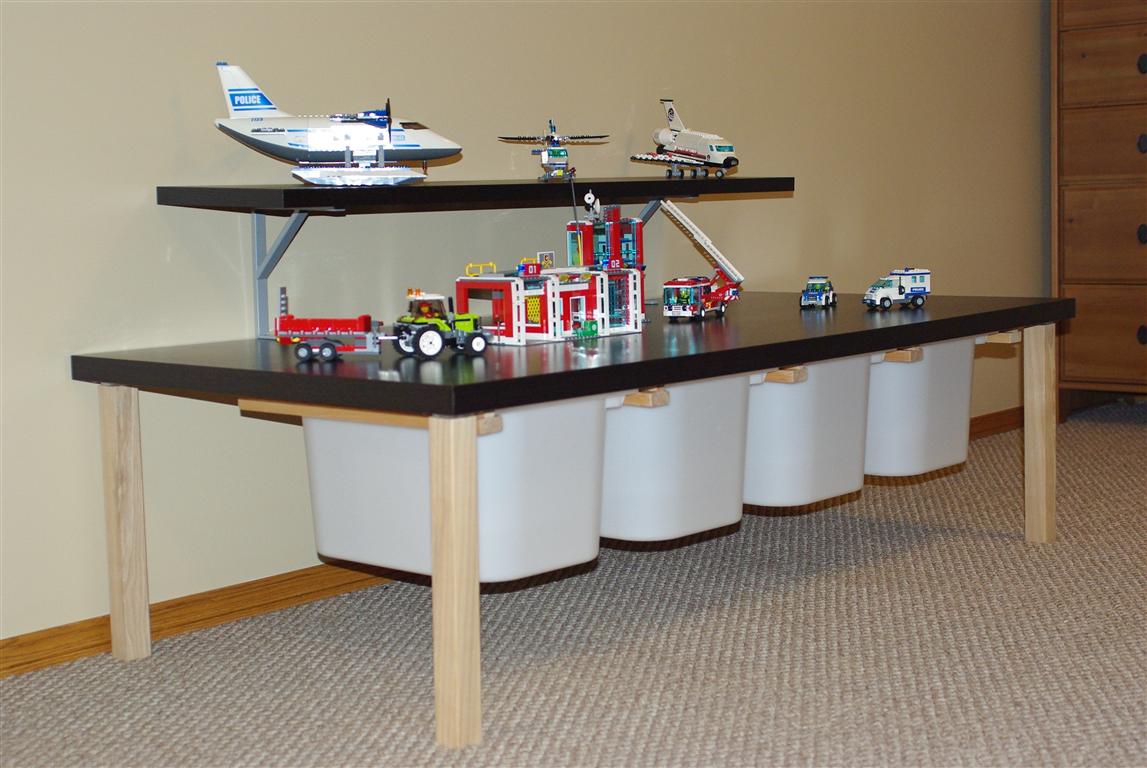
Remade: Lego Activity Table
Materials: Vika Amon table top, Trofast storage boxes, EKBY JÄRPEN EKBY TÖRE desk top shelf
Description: After we moved our office from the largest bedroom in the house to a small office space we no longer had room for our two desks, so we choose to build an activity table for our son using one of them.
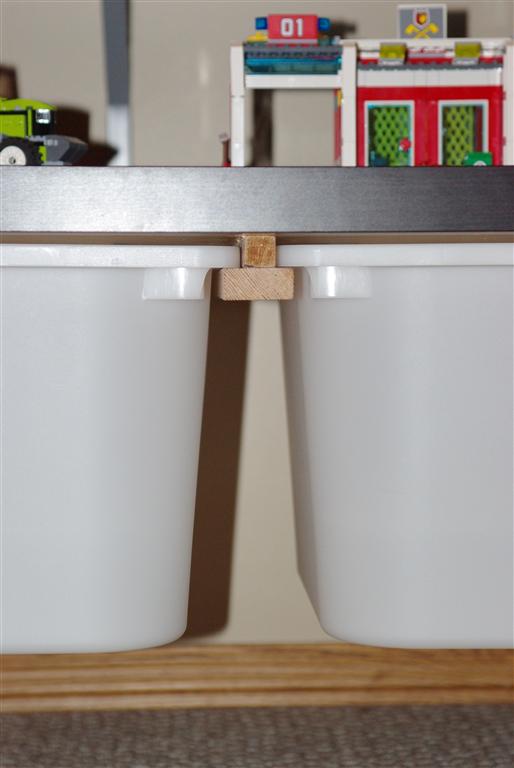
We decided to use Ikea Trofast storage boxes under the table for storage thinking it would be easy to buy runners for them. Although plastic runners were available a few years ago Ikea no longer sells them. Because of this I ended up having to build my own runners out of timber to get the boxes installed and sliding under the table top.
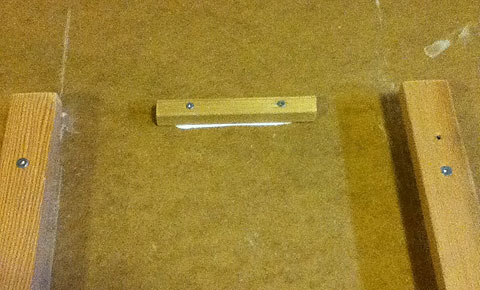
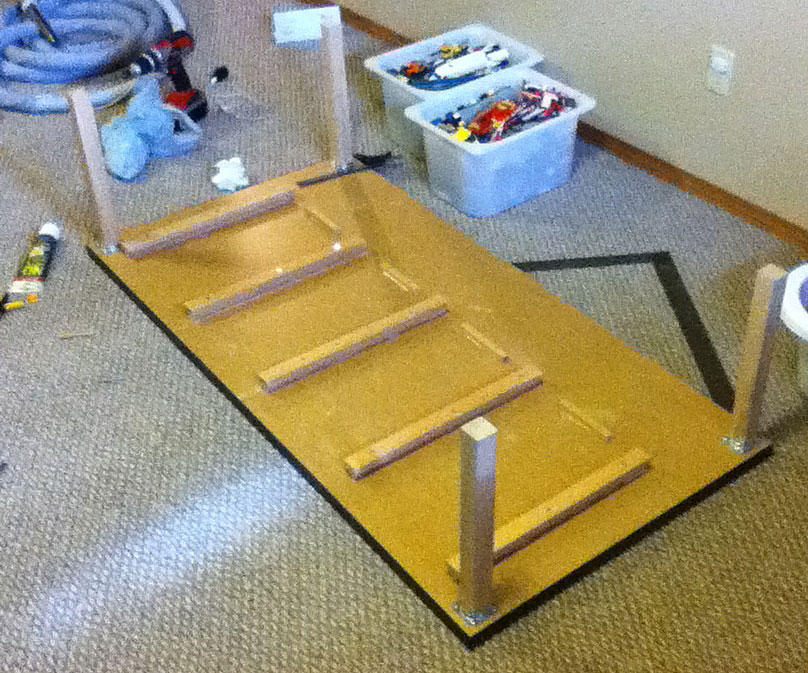
I started the construction of the activity table by attaching new coffee table legs from Home Depot. They set the table at a good height for my son to kneel and play at the table. Once they were attached I found the middle of the table and proceeded to attach the DIY Trofast runners I had previously built out of timber, starting in the middle and working my way out. I had to be very precise with my measurements here to make sure the boxes wouldn't bind while sliding them in and out. I finished the runners for the boxes by putting a small piece of timber at the back of the runners to stop the boxes from sliding all the way through.
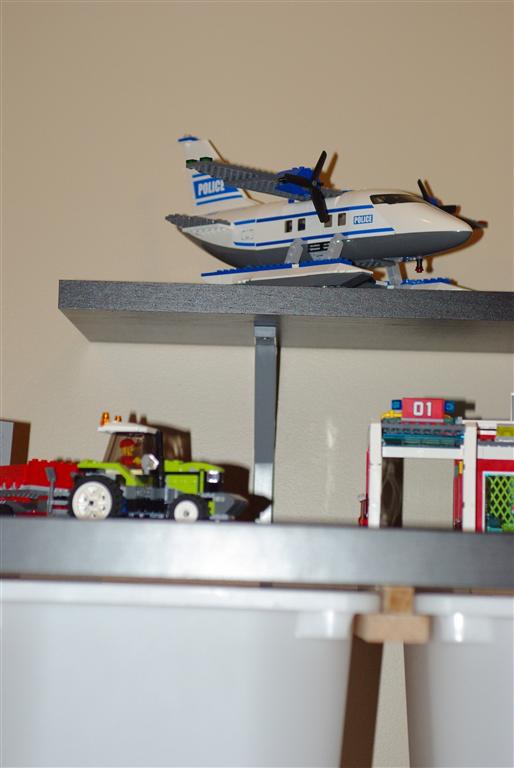
After the main table was finished I then followed the normal Ikea directions to install the desk top shelf and brackets for the Lego display shelf.
------------------------------------------------------------------------
DIY Lego Activity Table with Storage – Ikea Hack
November 16th, 2012 Bill Hutchison · No Comments
Although there are a few commercially available lego tables and activity tables most of them, unless ridiculously expensive, are quite small. Since my eldest son inherited all my Lego collection, plus had some of his own, we wanted a pretty big table, with a substantial amount of storage.
Thus was born my son’s Lego table!
The components used in building this Lego Activity Table were:
- 1 x 150cm x 75cm Ikea Vika Amon table top
- 4 x Ikea Trofast medium size storage boxes
- 4 x Pre-cut coffee table legs and bases from Home Depot
- 2.5m 1″ x 2″ fir timber
- 3m 1″ x 1″ fir timber
- Wood glue
- 1 1/2″ standard nails
- 2 3/4″ wood screws
We also decided to put a display shelf on his activity table, so to do this we got the 119cm wide EKBY JÄRPEN EKBY TÖRE table top shelf. It included the shelf as well as the two desktop mounting brackets to attach them to the activity table top.
Once we chose all the components that we needed for the table the construction was fairly straight forward, with only a few noticeable errors on my part …
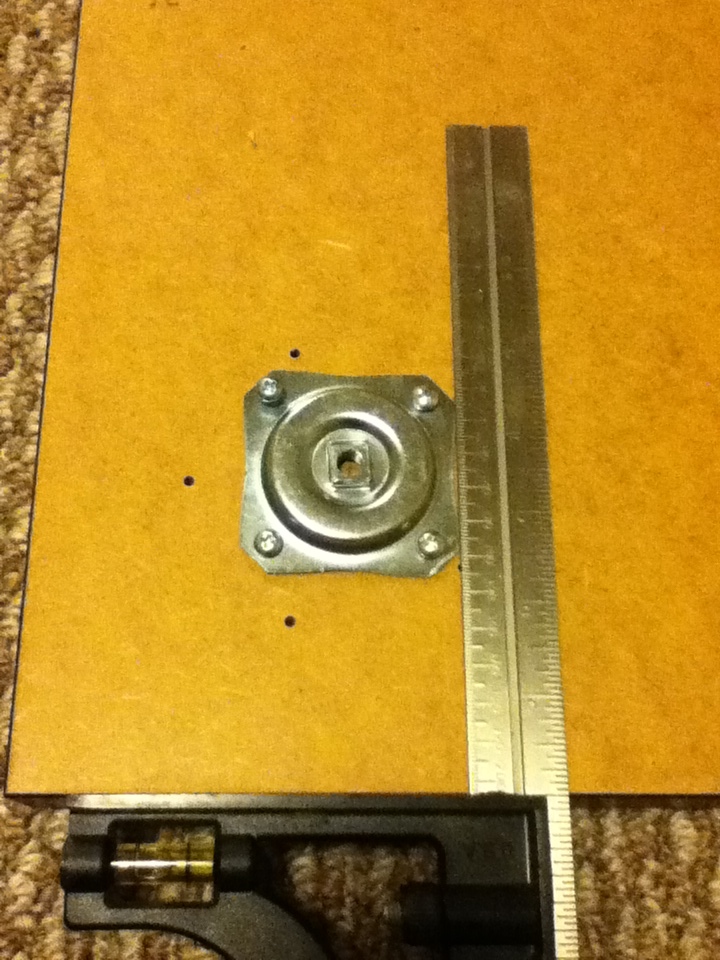
After my initial mistake with the table legs I attached the metal base 2cm inside the outer edge of the table. This gave me enough clearance to fit all four Trofast storage boxes between the legs…
My next step was to build the timber runners for the storage boxes. I choose fir because it was a much harder wood than pine, and hopefully would take a bit more of a beating as well…
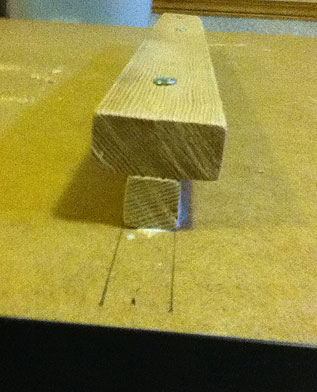
I cut five 40cm lengths of the 1×2 and 1×1 timber and then glued and nailed them together to for the runners.
After attaching the first runner I then proceeded to install the other runners, carefully measuring the distance and making sure that the runners are perfectly square to one another.
Unfortunately one of the runners I attached wasn’t exactly right and the storage box wouldn’t slide without getting stuck. Thankfully I found that out before the glue had dried and was able to remove it and try again, but it could have been a real mess had the glue dried.
After all the glue had dried and everything was lined up the four Trofast storage boxes slid in nicely, and then proceeded to fall right out the back of the storage table.
Thankfully I had some of the 1×1 timber left over so I cut four 10cm pieces and glued and screwed them at the back of the runners so that the boxes would stop sliding out the back.
At this point you could paint or stain the table legs to match the table top or other furniture in the room. We choose to leave it raw, mainly because we couldn’t agree on what colour or stain to use on it …
Once that was finished and dried it was as simple as following the direction to install the EKBY JÄRPEN / EKBY TÖRE desk top shelf to finish it off and we were done. One DIY Lego Activity table with storage…
Friday, March 8, 2013
Right Now: Eli
* you're grabbing for everything
* you discovered your feet!!!
* poor guy you have a big fat cold
* you are seriously the cutest baby I have ever seen (besides Ian)
* your big eyes suck me in
* whenever Ian comes near you, your eyes are fixed on him & instantly you smile & coo & laugh
* you're pretty much out of 3-6 month clothes and need 6-9 mo clothes
* it is rare for you to be irritable - you are usually very observant and so laid back
* I hope that you know who absolutely precious you are to us
* Ian loves you soooooo much!
Saturday, March 2, 2013
the thoughts you think but don't say....
there's something inherently beautiful and raw about thoughts when in the presence of God: sometimes they don't make a lot of sense at the time until.....time passes and you grow and then suddenly those thoughts make so much more sense....
as a child I knew that God wove my body into being although I hated my body and wanted it to be different and like someone else's --> He's taught me that my body is for His use, unique and fits only me and my personality, it is His temple & what I put into it and do to it completely reflects on my relationship & respect for Him since He created it
as a teen I knew that God did not restrict me....He was not restraining me from partying, drinking, drugs, foul language, sex but rather that He did encourage me to abstain from things for my own good - and I did abstain even though I could have gone my own way --> now He shows me daily that obedience is a blessing & not a restriction nor a curse...(& totally not boring!)
as a college-ager I knew that prayer would be a powerful thing and that "divine" encounters would happen --> now as He's taught me to pray more and more genuinely & intentionally I know that He moves & that those "divine" encounters begin sequences in my life that move me
as a graduate student I knew that being genuine & listening to an opposing worldview or argument was the right thing to do --> now He's taught me that grace abounds when I speak to those whom I do not agree with and love them still while remaining steadfast in what I believe
as a new wife I knew that I would have to be there for my husband and help him as best as I can --> now God's showing me that you fight & battle for your husband & marriage relationship daily b/c of the pressures/expectations that warring against us from our culture & evil in general and that it's humbling & sometimes it's not very fun
as a new mother I knew that loving my child would also include disciplining with love and showing him how to establish healthy boundaries --> now God's showing me that each child works with different methods and that their hearts are uniquely built to crave love
as a daughter of Christ I know that my identity is not my own --> now He's teaching me daily to surrender, abandon my ambitions for just myself, give up my pride (man do I have a lot of pride!!), give up the control, allow myself to be "with" Him, serve others, focus my energy on Him and utilize that energy to also bless my family
as a runner I know that only He gives me the ability to move and to coach others --> He continually teaches me that the achievements and accomplishments with races really doesn't mean much, it's the training that makes the real change in my life & my heart
as a questioner I know that asking the tough questions leads to growth, perspective & maturity --> He continually teaches me that exposing my doubts and allowing myself to live into the hard questions brings me closer to others & to Him (these are some of those questions: where do I feel pain...what do I fear?...who do I trust?...when will I be vulnerable...? what's in my heart? where do I hurt right now?...am I being real?...what don't I want others to know?...why do I strive to be liked?...what if somehow I won't matter?...what if who I am isn't significant?...what is in my heart?...where am I not surrendering?
Check out this website: http://thoughtquestions.com/
Wednesday, February 27, 2013
What I Learned working in Maternity for 8 weeks
I learned that:
* I never tired of seeing the miracle of life in newborn babies (God shows up no matter what)
* my therapeutic techniques and brief counseling showed up without me being intentional about it - it came naturally
* my love ethic towards the mothers was present in most all scenarios
* you really could write a book regarding the situations that are occurring within families or one woman's life
* I learned how to make accurate, brief, (albeit sometimes humorous) referrals to Children's Services
* my discernment skills became sharper
* I learned a better understanding of children's services and what really needs to be known or suspected in order to make a valid report
* being firm and kind is the best appropriate
* not everyone will like you - in fact they may detest the site of your face & what you represent to them in their life (i.e. not taking a baby home with them - or being involved in the system again due to their life choices)
* documenting was quite fun with moms and the conversations I had
* by checking how to correctly pronounce a mom's name or baby's name built rapport and showed respect
* assuming that the guy next to the mom is the father is a bad assumption or that the woman beside the mom is her mother.....it might be her sister and the guy might be her brother.....a.k.a. DON'T ASSUME
* a genuine smile and slowing my questions down, calms a room much quicker than me speeding through my assessment
* talking in a British accent to particular nurses on the floor when appropriate is way fun
* once you are on a unit for a while you begin to know the other staff's stories and their names and work isn't really "work" anymore...it's part of you and part of your passion
* I would love to say thank you to: (Cheryl, Patty, Gloria, Karen P., Karen F., Claire, Erin, Suzanne...the Case managers)
* I could really have blast and enjoy the difficult scenarios when working with a staff that is so fun and so supportive.
* Lastly, I learned that there's a reason that I'm a social worker and not a nurse, and that I get why the nurses say to me, "there's a reason that you're the social worker and I am not." We get each other and our gifts.
* Lastly, lastly, I'm gonna miss the conversations with my coworker Caroline. It's a beautiful thing when you allow yourself to be vulnerable with a trusted person and experience life together as you do when dealing with moms involved with heroin/meth/cocaine abuse, prescription drug abuse, potential abuse or neglect, homelessness, postpartum depression and anxiety and domestic violence amongst other things. I could see God's Spirit in our friendship and I'm gonna miss that time. Thank you Caroline.
Right Now: Eli 5 months
* you have slept two straight nights right through!
* you were bitten by a 1 year old in childcare this week
* you totally turn yourself over without a problem
* you and cereal really aren't friends yet....your tongue gets in the way!
* you're eating over 6 oz each feeding - still feeding every 3.5 hours
Saturday, February 23, 2013
Friday, February 22, 2013
Right Now: Elijah 21 weeks
* your giggle is music to my ears
* I get excited to see you in the mornings (especially if you would sleep well!)
* you're so big and growing out of being swaddled anymore
* you really think Ian is silly
* I get excited to see you in the mornings (especially if you would sleep well!)
* you're so big and growing out of being swaddled anymore
* you really think Ian is silly
Saturday, February 16, 2013
Friday, February 15, 2013
Right Now: Elijah 20 weeks
* you are enduring mommy's crazy schedule and are simply one of the most laid back babies I know (except when you are tired)
*
*
Friday, February 8, 2013
Right Now: Elijah 19 weeks (4.5 months)
Besides Ian, you are the biggest star in my eye. I look forward each day to seeing your smile and hearing your belly laugh. You had your 4 month old appointment today and weigh 14 lbs. and 26 1/4 inches.
You remain a cuddle bug.
You hold onto objects.
You focus on monkeys!
You sit up unassisted in the bumbo.
You just ate your first cereal.
You love playing with daddy & Ian.
* you roll from your stomach to your back
* you grab rattles
* you have one of the biggest belly laughs Dr. Weber has heard
* you recognize us well
* you have a hard time soothing yourself
* you're still eating every 3 1/2 hours or so and wake up at least once during the night
* we will now be starting you on cereal & Dr. Weber gave us new formula to move to - to help you not spit up so much
Subscribe to:
Posts (Atom)